Pada tutorial ini akan dibahas penggunaan image texture pada three.js.
Buat direktori img pada root project, kemudian simpan file image yang Anda inginkan.
Untuk menggunakan image pertama harus kita import dahulu. Buka file js/app.js, lalu tambahkan perintah import.
import ocean from './../img/ocean.jpg';Image dapat digunakan pada saat ShaderMaterial dibuat.
this.material = new THREE.ShaderMaterial({
    uniforms:{
        time: {value: 0},
        oceanTexture: {value: new THREE.TextureLoader().load(ocean)},
    },
    side: THREE.DoubleSide,
    fragmentShader: fragment,
    vertexShader: vertex,
    wireframe: true,
});
Berikut isi lengkap file js/app.js
import * as THREE from 'three';
import {OrbitControls} from 'three/examples/jsm/controls/OrbitControls.js';
import fragment from './shaders/fragment.glsl';
import vertex from './shaders/vertex.glsl';
import ocean from './../img/ocean.jpg';

export default class Sketch{
	constructor(opt){
		this.time = 0;
		this.container = opt.dom;

		this.scene = new THREE.Scene();

		this.width = this.container.offsetWidth;
		this.height = this.container.offsetHeight;

		this.camera = new THREE.PerspectiveCamera( 70, this.width / this.height, 0.01, 10 );
		this.camera.position.z = 1;

		this.renderer = new THREE.WebGLRenderer( { antialias: true } );

		this.container.appendChild( this.renderer.domElement );

		this.controls = new OrbitControls(this.camera, this.renderer.domElement);

		this.resize();
		this.setupResize();
		this.addObject();
		this.render();
	}

	setupResize(){
		window.addEventListener('resize', this.resize.bind(this));
	}

	resize(){
		this.width = this.container.offsetWidth;
		this.height = this.container.offsetHeight;
		this.renderer.setSize (this.width, this.height);
		this.camera.aspect = this.width/this.height;
		this.camera.updateProjectionMatrix();
	}

	addObject(){
		this.geometry = new THREE.PlaneBufferGeometry( 0.5, 0.5, 40, 40 );
		this.material = new THREE.MeshNormalMaterial();

		this.material = new THREE.ShaderMaterial({
			uniforms:{
				time: {value: 0},
				oceanTexture: {value: new THREE.TextureLoader().load(ocean)},
			},
			side: THREE.DoubleSide,
			fragmentShader: fragment,
			vertexShader: vertex,
			wireframe: true,
		});

		this.mesh = new THREE.Mesh( this.geometry, this.material );
		this.scene.add( this.mesh );
	}

	render(){
		this.time+=0.05;

		this.mesh.rotation.x = this.time / 2000;
		this.mesh.rotation.y = this.time / 1000;

		this.material.uniforms.time.value = this.time;

		this.renderer.render( this.scene, this.camera );

		window.requestAnimationFrame(this.render.bind(this));

	}
}


new Sketch({
	dom: document.getElementById('container')
});
Untuk menggunakan image texture, diperlukan vUv, yaitu 2D vector yang berisi UV kordinat dari pixel yang diproses. UV kordinat ada dalam rentang 0 – 1.
Buka file js/shaders/vertex.glsl, deklarasi variable vUv, kemudian assign value uv.
Berikut isi lengkap file js/shaders/vertex.glsl
//	Classic Perlin 3D Noise
//	by Stefan Gustavson
//
vec4 permute(vec4 x){return mod(((x*34.0)+1.0)*x, 289.0);}
vec4 taylorInvSqrt(vec4 r){return 1.79284291400159 - 0.85373472095314 * r;}
vec3 fade(vec3 t) {return t*t*t*(t*(t*6.0-15.0)+10.0);}

float cnoise(vec3 P){
  vec3 Pi0 = floor(P); // Integer part for indexing
  vec3 Pi1 = Pi0 + vec3(1.0); // Integer part + 1
  Pi0 = mod(Pi0, 289.0);
  Pi1 = mod(Pi1, 289.0);
  vec3 Pf0 = fract(P); // Fractional part for interpolation
  vec3 Pf1 = Pf0 - vec3(1.0); // Fractional part - 1.0
  vec4 ix = vec4(Pi0.x, Pi1.x, Pi0.x, Pi1.x);
  vec4 iy = vec4(Pi0.yy, Pi1.yy);
  vec4 iz0 = Pi0.zzzz;
  vec4 iz1 = Pi1.zzzz;

  vec4 ixy = permute(permute(ix) + iy);
  vec4 ixy0 = permute(ixy + iz0);
  vec4 ixy1 = permute(ixy + iz1);

  vec4 gx0 = ixy0 / 7.0;
  vec4 gy0 = fract(floor(gx0) / 7.0) - 0.5;
  gx0 = fract(gx0);
  vec4 gz0 = vec4(0.5) - abs(gx0) - abs(gy0);
  vec4 sz0 = step(gz0, vec4(0.0));
  gx0 -= sz0 * (step(0.0, gx0) - 0.5);
  gy0 -= sz0 * (step(0.0, gy0) - 0.5);

  vec4 gx1 = ixy1 / 7.0;
  vec4 gy1 = fract(floor(gx1) / 7.0) - 0.5;
  gx1 = fract(gx1);
  vec4 gz1 = vec4(0.5) - abs(gx1) - abs(gy1);
  vec4 sz1 = step(gz1, vec4(0.0));
  gx1 -= sz1 * (step(0.0, gx1) - 0.5);
  gy1 -= sz1 * (step(0.0, gy1) - 0.5);

  vec3 g000 = vec3(gx0.x,gy0.x,gz0.x);
  vec3 g100 = vec3(gx0.y,gy0.y,gz0.y);
  vec3 g010 = vec3(gx0.z,gy0.z,gz0.z);
  vec3 g110 = vec3(gx0.w,gy0.w,gz0.w);
  vec3 g001 = vec3(gx1.x,gy1.x,gz1.x);
  vec3 g101 = vec3(gx1.y,gy1.y,gz1.y);
  vec3 g011 = vec3(gx1.z,gy1.z,gz1.z);
  vec3 g111 = vec3(gx1.w,gy1.w,gz1.w);

  vec4 norm0 = taylorInvSqrt(vec4(dot(g000, g000), dot(g010, g010), dot(g100, g100), dot(g110, g110)));
  g000 *= norm0.x;
  g010 *= norm0.y;
  g100 *= norm0.z;
  g110 *= norm0.w;
  vec4 norm1 = taylorInvSqrt(vec4(dot(g001, g001), dot(g011, g011), dot(g101, g101), dot(g111, g111)));
  g001 *= norm1.x;
  g011 *= norm1.y;
  g101 *= norm1.z;
  g111 *= norm1.w;

  float n000 = dot(g000, Pf0);
  float n100 = dot(g100, vec3(Pf1.x, Pf0.yz));
  float n010 = dot(g010, vec3(Pf0.x, Pf1.y, Pf0.z));
  float n110 = dot(g110, vec3(Pf1.xy, Pf0.z));
  float n001 = dot(g001, vec3(Pf0.xy, Pf1.z));
  float n101 = dot(g101, vec3(Pf1.x, Pf0.y, Pf1.z));
  float n011 = dot(g011, vec3(Pf0.x, Pf1.yz));
  float n111 = dot(g111, Pf1);

  vec3 fade_xyz = fade(Pf0);
  vec4 n_z = mix(vec4(n000, n100, n010, n110), vec4(n001, n101, n011, n111), fade_xyz.z);
  vec2 n_yz = mix(n_z.xy, n_z.zw, fade_xyz.y);
  float n_xyz = mix(n_yz.x, n_yz.y, fade_xyz.x);
  return 2.2 * n_xyz;
}

uniform float time;
varying float vNoise;
varying vec2 vUv;

void main() {
  vec3 newPos = position;
  float noise = cnoise(vec3(position.x*4., position.y*4., time/10.));

  newPos.z = 0.1*noise;

  vNoise = noise;
  vUv = uv;

  gl_Position = projectionMatrix * modelViewMatrix * vec4( newPos, 1.0 );
}
Buka file js/shaders/fragment.glsl, tambahkan deklarasi vUv. Kemudian gunakan dalam fungsi texture2D().
varying float vNoise;
uniform sampler2D oceanTexture;
varying vec2 vUv;

void main(){
	vec3 col1 = vec3(1.,0.,0.);
	vec3 col2 = vec3(1.,1.,1.);
	vec3 finCol = mix(col1, col2, vNoise);

	vec4 oceanView = texture2D(oceanTexture, vUv);

	//gl_FragColor = vec4(finCol,1.);
	gl_FragColor = oceanView;
}
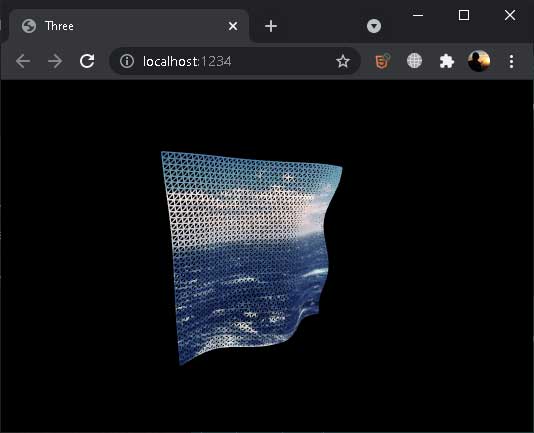
Jalankan parcel index.html, sesuai ekspektasi, object plan akan menggunakan texture image.